Pages

Tuesday, November 24, 2009

Masculine Card

This month I needed a handful of masculine cards. So I sat down and made what I needed and some extra. When I was going through my paper, I came across this retired paper. It was in last year's Holiday Mini Catalog. It uses the retired in-color from last year, Kiwi Kiss and Tangerine Tango. I thought this paper and colors made a good fall masculine card. I also used the Lovely as a Tree Stamp Set. The Neutrals 5/16 Inch Brads (112534) that I used on this card are put of the Online Extravaganza (regular price $7.95, sale price $5.57). I love these brads and I always grab them when I make a masculine card.

The inside of the card holds a gift card. I made one a few months back and you can see the details of the gift card holder here.

Have you seen the GREAT deals on the Online Extravaganza? There's some great bundles that would make excellent Christmas Gifts for those beginner stampers or seasonal stampers. Don't delay because these deals will only last until Monday, November 30, 2009.

Sorry it has been a little while since my last post. Last week I was getting ready for my November Christmas Card Stamp Camp, which was this past Saturday. I had a great turn out and we had a wonderful time getting those Christmas Cards done. I am now getting ready for my December Christmas Card Camp which is on December 6, 2009.

Have a Safe and Happy Thanksgiving.
Karen

Online Extravaganza

Get up to 50 percent off select products and product bundles. But hurry—the Online Extravaganza ends November 30!

Visit my Online Store to get great deals now! (click the shop now button on the top right corner)


Wednesday, November 11, 2009

Baby Card

Card Front
Back of Card

Inside of Card

I have been busy the past few days making cards. This is one of the cards I made yesterday. My husband needed one for a co-worker. I remember making a onesies card a few years ago but I couldn't find the template. I went on a search for a onesies template and came across these beautiful onesies cards and she has a link to the template. This card was not hard to make, just a little time cutting it out. Cute and fun to make.
Thanks for looking.
Karen

Friday, November 6, 2009

Simple Christmas Card


Here's a simple Christmas Card. It does use three different stamp sets ("Wandering Words", Grateful Greetings, Patterned Pines.) This card uses the Retired Riding Hood Red re-inker mixed with the Shimmer Paint and the wide ribbon.

I hope everyone has a great weekend.

Thanks for looking,

Karen

Wednesday, November 4, 2009

Shimmer Paint with Reinkers

Riding Hood Red Reinker and Ribbon
Real Red Craft Reinker

This card is a simple but pretty card. It was made using Stampin' Up! Movers and Shapers Curly Label Die. When I went to mix the Champagne Mist Shimmer paint with Classic Real Red Reinker, I realized I did not have any. I only had Riding Hood Red and Craft Real Red Reinker. I first tried it with Riding Hood reinker and attached some retired ribbon to the card. I love this ribbon, I wished it now came in Real Red. I loved the way the card turned out but I did not have enough ribbon to offer this card as a class. So I went back to making another card with the Craft Real Red Reinker. I like this card too but I am going to order a wider ribbon to go on this card. I am going to order either the polka-dot or the striped Real Red Ribbon.

Thanks for looking,
Karen

Tuesday, November 3, 2009

Santa Flying Through The Night Sky

Card Front

Inside of Card

Merry Christmas to all and to all a good night. (Sorry I couldn’t help myself.) This is one of the cards from my December Christmas Card Class. The card front uses Glossy White Cardstock and is sponged with Bashful Blue, Bordering Blue and Night of Navy while the moon is masked with a post-it note circle. The moon, than is lightly sponged with So Saffron ink. Santa is embossed using Craft Black Ink and Clear Embossing Powder. The trees on the bottom of the card are from the Lovely as a Tree Stamp Set. They are inked using Silver Ink and embossed using Iridescent Ice Embossing Powder. This card look beautiful in real life.

Thanks for looking,

Karen

Monday, November 2, 2009

December Christmas Card Class


Winter Post Meets Bronze Shimmer

Santa flying through night sky - Embossing & Sponging

Holly Jolly with shimmer paint and red ink

Good Cheer Pocket Card - Watercolor

Sign-up now for the December Christmas Cards Stamp-a-Stack Class that is being offered in St. Mary's County.

30 Cards - Pick 3-designs - 10 of each

Class Cost: $42.00

If you can't decide do all 4-designs - 10 of each

Class Cost: $50.00

Date: Sunday, December 6, 2009

The class cost includes envelopes and a bottle of Champagne Mist Shimmer Paint (Used on 3 - of the card designs). Cards are pre-cut and scored. All you will need to do is stamp, punch, emboss and assemble.

Please bring: your preferred adhesive.

Time: 12:00 pm - 4:00 pm

Deadline to sign up is November 20th. Payment is due at sign-up.

Send me an email if you want to attend this class.

Thanks for looking,
Karen

Holiday Extravaganza

Make Stampin' Up! your one-stop shop for all the special people in your life!
Use our Holiday Extravaganza Gift-Giving Guide to find gifts for kids, teens, neighbors, card makers, scrapbookers, and more--or to find the supplies you need to create special handcrafted gifts.

Plus, from November 1 to January 4, receive a FREE Décor Elements piece (up to a $16.95 value) when you spend $50 on products in this guide!

Download your Gift-Giving Guide Here!

Download your Dear Santa Letter Here!

You can order Stampin Up! products on-line 24/7, just click here.

Thanks for looking,
Karen

Tuesday, October 27, 2009

Another Bronze Shimmer Card


Inside of Card

Here's another card using the Homemade Bronze Shimmer paint. You really have to see the shimmer in real life, it is beautiful. This one was my first card using the Bronze Shimmer but I thought for a class card yesterday's card would be easier to mass produce. I used some of the Retired Rope Twine (#113017). If you missed this rope twine last year or need more, this is one of the few great buys on Stampin' Up! Clearance Rack. Just click on the "Shop Now" Button.

Thanks for looking.
Karen

Monday, October 26, 2009

Deals of the Week


Week 4 Deals of the Week

Princess Party Kit #116214
Price: $9.99
You can make your princess's fantasies come true with our Princess Party kit. Your little princess and seven of her ladies-in-waiting can celebrate a splendid happily-ever-after complete with invitations, decorations, and dazzling crowns to create and wear.
■ Contains products to create invitations, crowns, purse boxes, banner, and food toppers for eight
■ Coordinates with the Princess Time stamp set and Princess personalized name stamp

Pirate Party Kit #116213
Price: $9.99
Hoist the Jolly Roger and get ready to have a swashbuckling good time! Gather your little buccaneer and his or her mateys for a pirate party of the finest sort, complete with invitations, decorations, and eye patches to create and wear. This kit contains products you need to create party invitations and decorations for eight guests.
■ Contains products to create invitations, eye patches, banner, treasure boxes, and food toppers for eight
■ Coordinates with our Pirate Time stamp set and Pirate personalized name stamp


**This is the last Deal of the Week - This Deal Ends - October 31, 2009 - Online Orders 11:50 PM (MT)

Winter Post Meets Bronze Shimmer

Card Front

Inside of Card

Here's another type of pocket card but this pocket is on the inside of the card. The card base is 5 1/2" x 8 1/2"; scored at 1/2" and 4 1/2". This card will be offered in my December Christmas Card Class. I used a few drops of Chocolate Chip re-inker mixed with the Champagne Mist Shimmer paint (#116806). I love the Bronze Shimmer on the Kraft and Real Red. It has a beautiful shimmer in real life and is fairly easy to reproduce.

I used one of my favorite Christmas stamp sets "Winter Post" (#111780) and the Christmas Punch Stamp set (#115366, Hostess Level 2).

Thanks for looking.
Karen

Sunday, October 25, 2009

November Christmas Card Class

One - Pocket Card


Santa Embossed


Dasher Embossed


Here's the three designs for the Christmas Cards Stamp-a-Stack Class that is being offered at Ceramics and More located in Waldorf, MD.

Class Cost: $35.00

Date: Saturday, November 21, 2009

3 different card designs - 24 total cards/envelopes

Cards are pre-cut and scored. All you will need to do is stamp, emboss, punch and assemble. Please Bring: your preferred adhesive.


Time: 11:00 am - 4:00 pm

Deadline to sign up is October 31st.

Send me an email if you want to attend this class.
Thanks for looking,
Karen

Good Cheer Pocket Card

Here's two Pocket Christmas Cards with different color schemes (Bravo Burgundy and Always Artichoke / Garden Green and Real Red). I always send Christmas Cards with a picture of my kids and I know other people do to, so I like to show a few different card designs for this purpose. These cards are very easy to make, directions for the pocket card can be found on Splitcoaststampers.

I sprayed each card with some homemade shimmer mist using Stampin' Up! Champagne Shimmer Paint (#116806).

One of these cards will be in my December Christmas Card Class. I have to pick which color. My favorite is the Bravo Burgundy and Always Artichoke.

Leave a comment and let me know what you think.

Thanks for looking!
Karen

Sunday, October 18, 2009

Photo Wallet Tutorial

Here's the tutorial for the Photo Wallet. I came across Amy Celona's version of the photo wallet about a year ago and did not have her size envelopes. I changed the directions to work with Stampin' Up! Small Open End Envelopes. I made the wallet a little bigger and I also used a Top Note for the flap. Of course the envelopes that I am using today are a retired color. They now only come in Whisper White. I do wish they bring back the Very Vanilla and the Kraft in the Small Open End Envelopes.
Supplies Needed:

1 - Chocolate Chip Cardstock (#107102) - 12" x 4 1/4"; Scored at 3 5/8", 3 3/4", 7 1/2", 7 5/8", 11 3/8, 11 5/8"
1 - Real Red Cardstock (#106545) - cut with "Top Note" die - (#113462)
1 - Piece of Merry Moments Designer Series Paper (#115672) cut for front of wallet - 4" x 3 1/2"
3 - Small Open End Envelopes - (Very Vanilla - Retired) Cut to 4" long
3 - Inside Pages - 3 1/2" x 5" scored @ 1" - Red, Garden Green, and Chocolate Chip
3 - Slide outs - 3 7/8" x 3 3/8" - Red, Garden Green and Chocolate Chip
3 - sets of Merry Moments Designer Series Paper (#115672) - 1 set photo corners, 1 set Curly Label, (2-pieces) of 1" x 3 1/2"
Velcro Dots
Ribbon
Photo Corner Punch - (#109042)
Curly Label Punch - (#112208)
Scallop Oval Punch (#114889)


1. Score an 1/4" in the middle of the top note. I found it was easier to use my score-it for this step.

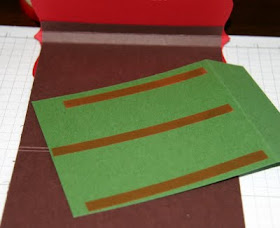
2. Apply Sticky Strip Tape to the back inside of the top note and on the top flap of the wallet. Like shown above. Do not take the other strip off of the tape yet.

3. Make sure the Top Note folds correctly and is centered over the wallet.

4. Setting the top of the wallet on the table, let go of the front of the top note and remove the strip of the sticky tape and adhere it to the wallet flap.
5. Now do the back side of the top note. Remove the strips from the tape and adhere the top note to the back side of the wallet.
6. Punch the open flap of the envelopes using the Curly Label Punch. Leaving an 1" gap from the closed end, stamp your envelopes with whatever images you want. (you sure do this before you adhere in case you mess up). Lay your wallet inside pieces out and adhere using Sticky strip tape. The middle page should be in the reversed direction of the top and bottom flaps, it just folds better. (See below).
7. Attach the remaining pieces and ribbon to the wallet.
8. Attach your ribbon to the front DSP piece before adhering it to the front of the wallet.
9. Finish the ribbon and attach your Velcro dot, just under the top note flap.


If you have any questions, please leave a comment or send me an email.
Thanks for looking,
Karen
**PDF Version of the Tutorial