Friday, June 19, 2009

SC233 Card Sketch and Father's Day Card


Here's my version of the card sketch SC233 from SplitcoastStampers. I decided to make a Father's Day Card with the sketch since it was on my list of things to do. I used the Manchester Designer Series Paper, Always Artichoke, Kraft and Very Vanilla paper. I also used the new "Teeny Tiny Wishes" Stamp Set and the new "Modern Label Punch". (These two items and more will be available for you to order on July 1st.) The "Manchester Designer Series Paper is on the retired list and will not be available after June 30th, so if you want this paper you will need to order it soon.
If you have any questions, please leave me a comment or send me an email. Have a great weekend, I will post again on Monday. Thanks for looking.

Wednesday, June 17, 2009

Father's Day Briefcase Scrapbook

Look what I made for my husband today. I still need to put pictures inside and some photo corners but I couldn't wait to share it with you. This envelope scrapbook is usually made with 3 - regular Stampin' Up! Envelopes but I used 4. This is such an easy project, all you do is adhere the envelopes together using the flaps. The hardest thing was doing the buckle and handles. I used the Manchester Designer Series Paper, Always Artichoke, Chocolate Chip, Kraft paper and Kraft envelopes. I also used one small magnetic snap for the closure of the briefcase. If you have any questions, please send me an email or leave me a comment. Thanks for looking.
BTW: I am sorry for the pictures lately, it is always raining when I need to take pictures outside.


Tuesday, June 16, 2009

Pink Pirouette Meets Manhattan Flower


This is a card I made with the Pink Pirouette, Parisian Breeze Specialty Designer Paper and the Stampin' Up! Manhattan Flower Textured Impression Die. I also used the "Great Friend" Stamp Set that is in the Mini Catalog. This stamp set works with the "Stampin' Up! Matchbox" Die that is also in the Mini Catalog. Thanks for looking.

Monday, June 15, 2009

Card Sketch SC232


Here's my version of the card sketch from SplitcoastStampers. I used the new "Tall Tales Designer Series Paper ", "Animal Stories" Stamp Set, and the "Modern Label" Punch. These new products and more will be available for you to order on July 1st. The "Tall Tales Designer Paper" colors are Chocolate Chip, Rose Red, Old Olive, Brilliant Blue and So Saffron. This paper is really cute and reminds me of Animal Kingdom at Disney World.

I wanted to use another new stamp set called "Teeny Tiny Wishes" but I have not recieved it yet. The stamp set works great with the new Modern Label Punch. It should come in this week. I hope you like the card and I hope you try the card sketch too. Thanks for looking.

Friday, June 12, 2009

Top Note Purse Instructions

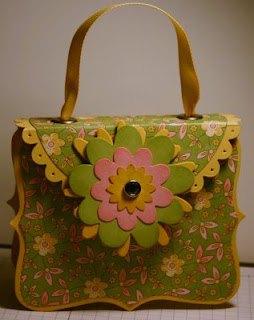
Sorry I missed a few days on posting. I have been busy with trying to entertain the kids on their first few days of summer. I took a little time this morning to take some pictures to post instructions for this Top Note Purse. These instructions use the Paper Sacks - they come in a bag of 16 - Size - 3 1/2" x 2" x 6 3/4". They can be found in the gift bag aisle of the local craft store. There are instructions to make this purse without the bags - Becky Roberts Web Site.

Supplies:
2 - Top Note pieces
2 - trimmed Top Note pieces
1 - paper sack I cut the top off, so the bag should be 3" tall.
1 - piece of cardstock cut using the Clear Circle Die - (a little less than a 4" circle)
1 - piece of cardstock cut using the Circle, Scallop Die - (4 1/2" scallop circle)
piece of ribbon
2 - jumbo eyelets

Score the scallop circle at 1 3/4" and 2 3/4".


I place the circle on top of the scallop and mark the score lines for the circle and than I score. I don't know if this is the correct way but it just makes sense to me. Attach the circle to the scallop with sticky strip tape or scor-tape. I used a paper piercer to punch a hole into each scallop on the circle. Which can be seen in the finished picture.


Apply sticky tape or scor-tape to the one side of the paper bag (make sure it has been cut to 3"), attach to the inside of the top note.

Fold the bottom flap down so the you can apply tape to the other side of the bag. Attach the other top note to the bag.

After attaching the bag to the top notes you should have a Top Note Bag.


Attach the jumbo eyelets to the lid of the purse. Once the eyelets are attached, attach the one side of the lid to the back of the purse. Run the ribbon through the lid. Attach a velcro circle to the inside flap. Embellish the front as desired. I was able to fit 5 - 3 x 3 cards and envelopes inside this purse. If you have any questions, please email me.
Thanks,
Karen

Wednesday, June 10, 2009

Another Top Note Purse and 3 x 3 cards


Here's another version of the Top Note Purse with 3 x 3 monogrammed cards. I made this one with the Bella Rose Designer Series Paper. This paper is also retiring this month, it is another one of my favorite designer papers...I love the pink pirouette in-color. If you have any questions, email me or leave a comment.
Thanks for looking!

Monday, June 8, 2009

Card Sketch SC229

This is my very first challenge. This sketch is from SplitcoastStampers under Card Sketches. This challenge was posted 2 weeks ago but I saw the sketch and knew what I wanted to do. After completing my first challenge I find it gets my creativity grove going. I was ready to move on to last weeks challenge but I have other things I have to get done today. I plan to do more sketches once the kids get out of school. This week has been crazy.


The card base is Very Vanilla, Old Olive and Chocolate Chip. The Chocolate Chip and Old Olive pieces were run through the big shot using the textured plates and finished with a sanding block. I have always been afraid to use the textured plates...I'm not sure why. They are very easy to use. On the bottom right side of the card I added three 5/16" Neutral Jumbo Brads, I love these brads. The image is from the stamp set Inspired by Nature. I did emboss this image with clear embossing powder and Old Olive Craft Ink. I used the Horizontal Slot Punch to punched out brown slots to add to the image.

Thanks for looking!
Karen

Sunday, June 7, 2009

3 x 3 cards and Top Note Purse


I picked this Top Note Purse and 3 x 3 monogrammed cards to make for my son's teachers as end of year gifts. I have seen several different ways to make this purse but I picked the easier way, which is to use a small paper bag as the middle of the purse. I made these with my favorite paper, Parisian Breeze. If you have any questions, email me or leave a comment.
Thanks for looking!
Karen

Saturday, June 6, 2009

Lots of Bots


"Lot of Bots" is one the of Sneak Peeks that the demonstrators can pre-order. As soon as I seen this stamp set, I had to get it. I am always looking for something older and manly for my two older boys and my husband, besides what boy does not like robots. My son had to go to a birthday party today and I could not wait to use the new stamp set.

This is a 3x3 card in Basic Gray, and Baja Breeze cardstock.

I first inked the robot image using Versa Mark than lightly inked with basic gray ink. Once I stamped the image onto the watercolor paper, I used clear embossing powder and heat set the image. The image was water colored with Baja Breeze and Basic Gray Ink.

The Baja Breeze Paper I stamped the Nuts and Bolts Stamp from the same stamp set with Basic Gray Ink. Before attaching the Baja Breeze Paper to the card I used my new "Modern Label Punch" on the front flap. Used a thin line of dimensionals to the outer edges of the Baja Breeze piece of paper, this will leave a little room to slip money into the inside flap. Silver brads were used on the four corners of the watercolor paper.

What do you think? Do you love this new stamp set? This stamp set and the modern label punch will be available in the Stampin' Up! 2009-2010 Idea Book and Catalog beginning July 1st. Have you preordered your new catalog? If not send me an email.

Check back tomorrow and see what I made for my son's teachers.

Enjoy your weekend.

Thanks for looking!
Karen

Friday, June 5, 2009

Muffin Toppers


Sorry I am late posting today, my kids get out of school the beginning of next week and I have a million things to complete before than. Nothing like waiting till the last minute. One of the fun things I did was make 45 of these cute muffin toppers for the Bus Drivers and custodians at my son's school. I am the hospitality chairperson for the middle school and at the end of the year, I like to give them something little. I thought the individual muffins would be good for a change. I just could not figure out what to do with them. This is what I came up with. What do you think?
I used some of the paper in those hostess paper packs. The ribbon I did get from Michael's, Stampin Up does not sell 5/8" white grosgrain ribbon.
BTW: My new catalog came today. I took a break to look through the catalog and I am in love with so many new items. I did order a few items from the Demo Sneak Peek and I hope to get some samples for you in the next few days. I can't wait to share them with you.
Have a great weekend!
Thanks for looking!

Thursday, June 4, 2009

Father's Day Bookmarks

OK this is what I came up with for a father's day bookmark. What do you think?

The first one is made with the Manchester Designer Series Paper, Always Artichoke Ink, Kraft paper, Twill Tape and one Jumbo Eyelet.

The second one I made with the Parisian Breeze Specialty Designer Paper, Kraft paper, Chocolate Chip Ink, Twill Tape and one Jumbo Eyelet.

Thanks for looking!


Wednesday, June 3, 2009

Scrapbook Purse Instructions


A couple people have asked for instructions for the scrapbook purse. This purse was originally designed by Jan Tink. Her instructions can be found here. I am also posting the instructions for my version of the purse. Please let me know if you have any questions.

Instructions:
· 1 piece of Chocolate Chip Paper 6” x 8 ½” (Scored at 2 ½”)
· 1 piece of Chocolate Chip Paper 6” x 11” (Scored at 2 ½” & 5)
· 1 piece of Chocolate Chip Paper 6” x 4” (Scored at 2 1/8” & 1 7/8”) (top flap)
· 1 piece of DSP 6”x 3 ½” (Scored at 1 5/8” & 1 7/8”) (top flap)
· 2 pieces of matching DSP 5 ¾” x 5 ¾” (outside of purse)
· 2 coordinating pieces of DSP 5 ¾” x 5 ¾” (inside of purse)
· 2 pieces of coordinating cardstock 5 ¼ “ x 5 ½” (inside pull-outs)
· 2 pieces of coordinating DSP 2 ¼” x 5 ¾”
· 1 piece of coordinating cardstock of 4 ½” x 4 ½”
· 1 piece of coordinating cardstock of 4 ½” 4 ¾”
· 1 piece of coordinating cardstock 2” x 4” (Chocolate Chip)
· 1 piece of coordinating cardstock 2” x 3 ¾” (White)
· Embellishments – Ribbon, tags and brads


Fold the 6” x 11” piece of cardstock like shown above. Put adhesive on the inside flap of the 6” x 8 ½” piece of cardstock and adhere to the bottom of the larger piece. It should be the shape of a W, which is the front, bottom and back of the purse. Attach the 2 pieces of DSP to the outside of the purse.


Using the eyelet punch, punch both sides and both pieces for the top flap. Make sure the pieces line up before you adhere the pieces together; I used scor-tape on the inside flaps not the center spine. Use the crop-a-dial to punch two holes like shown above for the jumbo eyelets.


I attached the ribbon to the top flap before attaching it to the purse; I used scor-tape under the ribbon. Apply more scor-tape to the same side of the flap and attach it to the back of the purse. Attach your Velcro dots to the top flap and the front of the purse.


Take the 2 - coordinating pieces of DSP 5 ¾” x 5 ¾” (inside of purse) punch a half circle on the one side. Put a line of dimensionals along the outside 3-edges (not the side with the half circle is punched out. Attach these pieces to the inside of the purse.

Check and see if you need to trim the 2- coordinating pieces of cardstock 5 ¼” x 5 ½” (inside pull-outs). These pieces should easily slide in and out of the pockets you just created. Once trimmed attach a piece of ribbon with a brad to make it easier to pull in and out or use Stampin’ Up round tab punch.
Attach the remaining cardstock and embellishments.
That is it. If you make one, I would love to see it, please post a comment with a link to your purse.
If you have any questions, please let me know.
Thanks for looking!

Parisian Breeze Scrapbook Purse


As promised, here's the scrapbook purse I made with the Parisian Breeze Specialty Designer Paper. This is the version of the Mother's Day purse that I made for my mom for Mother's Day. I wanted to give her one that was a little different than the one she made in my class. She likes the Baja Breeze In Color and this is one of my favorite Designer Series Paper in the spring and summer catalog. Oh course it is on the Last Chance List.


Do you like what you see on my blog, do you want more? If so make sure you sign up for email updates. You will get an email when I make a new post on my blog.

Thanks for looking!

Tuesday, June 2, 2009

Another Manhattan Flower Card


Here is another card I made using Stampin' Up! Manhattan Flower Textured Impression Die (I love this die, I am hoping Stampin' Up will have more in the new catalog). I used the Parisian Breeze Specialty Designer Paper and ran it through my big shot. Next, I used a sanding block on the raised image. After sanding I took a sponge dauber and Baja Breeze Ink and gently rubbed in a circular motion over the flower image.

Check back tomorrow and I will show you another Scrapbook Purse I made with the Parisian Breeze Specialty Designer Paper.

FYI: The Parisian Breeze Specialty Designer Paper, Valet Ribbon Originals, Baja Breeze Paper and Ink are on Stampin' Up's Last Chance List. After June 30 they will not be available. Check out these products and other items on my web site, click on my Shop Now button.

Recipe:
Paper: Parisian Breeze Specialty Designer Paper (113993), Baja Breeze Paper (111352), Chocolate Chip Paper (107102)

Tools: Ticket Corner Punch (107214), Sponge Dauber (102892), Stampin' Up! Manhattan Flower Textured Impression Die (114517),
Ink: Baja Breeze Classic Stampin' Pad (111833)

Embellishments: Silver Brads (104336), Valet Ribbon Originals (114318)

Monday, June 1, 2009

Fifth Avenue Floral Double Page

Here's another double page layout that we did at our scrapbook class in April. These 2 pages took a little time but it was worth it. We made the background paper using the Fifth Avenue Floral stamp set (I love this stamp set), and also made an eyelet ruffle for the Wide Oval Punch out.

Recipe:
Paper: Pacific Point Textured (111345), Baja Breeze (111352), Basic Gray (109691), Whisper White (106529)
Tools: Eyelet Border Punch (113692), Wide Oval Punch (112082), Crimper (101618), 1/2" Circle Punch (104390), Sponge Dauber (102892), Stampin' Up! Manhattan Flower Textured Impression Die (114517),
Stamps: Fifth Avenue Floral (113734)
Ink: Basic Gray Classic Stampin' Pad (109120), Pacific Point Classic Stampin' Pad (111837), Baja Breeze Classic Stampin' Pad (111833)
Embellishments: Build a Brad – Pewter (109128), Basic Gray Taffeta Ribbon (109064), Whisper White Taffeta Ribbon (109070)