Monday, March 23, 2015

Easter Bunny Fry Box


Here's a cute little Easter Bunny Project I made over the weekend.  I have been seeing a lot of little bunny bottoms hanging on the edge of cards, boxes and bags, so I had to make one.  I thought it was such a cute idea.  I thought I saw one a couple weeks ago that had the 2 bunnies like this one but I could not find it.

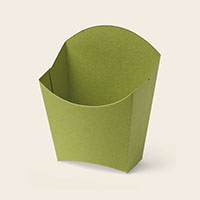
The two bunnies jumping into the fry box, one from the front and the back was just darling, if I don't say so myself.  I did one in the Whisper White but I really liked the Very Vanilla Rose (these are retired) for the bunny tail.  The Whisper White bunny, I added a Blushing Bride Rose for the bunny tail.  The leaves is an older sizzix (Thanks, Mom for reminding me that I had it).  

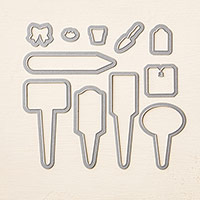
This is when the Handpicked Framelits are handy for that little sign and the cute little bow on the bunny.  My daughter and I were trying to put the bow on the ear for a girl bunny but it just did not sit right.  I still think he is a cutie.  

Thanks for stopping by and letting me know what you think!

Thanks,
Karen


Sunday, March 22, 2015

Stampin Up Coloring Techniques Videos

Here are some quick videos to watch to refresh on some coloring techniques.


If you have any questions, please let me know.

Thanks for stopping by!
Karen

Thursday, March 19, 2015

Blue Crab Flap Fold Card


When the first time I saw this paper from the SAB Sheer Perfection Vellum paper, I thought it would be great for a Nautical Card.  I remember I have been wanting to make a Flap Fold Card since I saw it last week.  So I pulled out the By the Seashore Stamp Set and went to work to make a Blue Crab Card.  I did use some retired ribbon.  The embossing folder I used is a non SU embossing folder (I wished we had a anchor embossing folder).

I left the inside blank to stamp for any occasion.

Thanks for stopping by and letting me know what you think.


Thanks,
Karen


Wednesday, March 18, 2015

Nature's Perfection Pocket Card


When I was playing with the Sheer Perfection Vellum, I thought this piece of vellum would be prefect to dry emboss.  This time I went with the 2014-2015 In Colors.  Lost Lagoon, Blackberry Bliss, Mossy Meadow and I added a little Wisteria Wonder. 

If you have not Dry Embossed, you just take your stylus from your Simply Scored Scoring Tool.  Flip your vellum over on your Stampin' Pierce Mat and lightly write/color into the image using the stylus.  You have to be VERY careful, because the vellum with rip easy.  It is hard to see the dry embossed but in real life, the flowers really pop (if you are having a hard time seeing the image against the mat place a piece of copy paper between).  


Once the vellum was dry embossed, I colored with my markers.  I think the card is really pretty and can easily be made with different colors.  


Thanks for stopping by and letting me know what you think.

Thanks,
Karen


Tuesday, March 17, 2015

Nature's Perfection Mojo Monday 389


I have been playing around with the New SAB Sheer Perfection Designer Vellum Stack, it has been fun.  When I saw the Mojo Monday sketch I knew it was prefect to showcase a piece of Vellum from
the pack.  I choose the piece of vellum I could showcase the matching flower from the Nature's Perfection Stamp Set.

  • I colored the back of the piece of vellum with my markers.  Which I thought was too dark so I used my aqua painter to lighten it up in areas and wiped with a tissue to remove the excess water.  I placed a tissue onto and placed my large Clear Block onto to let dry for a bit.  I used the Adhesive Sheets to attach the vellum to a piece of Whisper White Cardstock before adhering it to the cardbase.  
  • My flower image was stamped on a piece of watercolor paper using Staz On ink.  I colored the image using my Aqua Painter and ink pads.  I finished it off with a couple sprays of homemade shimmer mist.  
  • I stamped the Butterfly from the SAB Nature's Perfection Stamp set on plain vellum and punched out using my Butterfly Punch.  I attached a little Baker's Twine to the middle.  
  • I had some retired Basic Gray Satin Ribbon that I pulled out to use on this card.  I think the Basic Gray goes so nicely with the 2013-2015 In Colors.  

Thanks for stopping by and letting me know what you think!  

Thanks,
Karen


Sunday, March 15, 2015

Vintage Painted Petals


I sat down to play with the Painted Petals Stamp Set again.   I really love this stamp set.  With this card, instead of stamping in the lines, (pun intended), I used this stamp set differently.  With the magic of a couple post it notes, I was able to mask a few images here and there and created this card.  At first I was not sure if I wanted to stamp on Very Vanilla or Whisper White so I did both and realized, I really loved it with the Very Vanilla.  I love the Vintage look or should I say Shabby Chic?  

I first stamped the group of flowers with the Blushing Bride Ink, I masked a couple flowers until I got the flower base I wanted.  I really love the three roses together, so I pulled out my Strawberry Slush Ink pad and stamped the two roses once in the center and stamped again but masking with a post-it note to make a grouping of three roses.  Next come the leaves, of course, I could not use the leaves whole so I would ink up the two different ends with Wild Wasabi Ink and stamped around the 3 roses using my post-it note to make sure to not stamp anywhere else on my creation.  Before re-inking the leaves again, I would stamp around the Blushing Bride Flowers so it would be a lighter shade of green.

I covered the Blushing Bride cardbase with a sheet of Very Vanilla stamped with the Dictionary Stamp Set in Sahara Sand.    Everything was lightly sponged with Sahara Sand Ink.    To change things up a bit, I used my corner rounder on the top left and bottom right pieces.  Next I added some Sahara Sand Lace, one of the Blushing Bride Roses from the Artisan Embellishment Kit and added some colored pearls to the top left side of the card.

When I was done with the card, I forgot I had a few pieces stamped in Whisper White.  I decided to just go ahead and make a duplicate card in the Whisper White, that is the card on the left.  It is pretty in the Whisper White but my personally favorite is the Very Vanilla.

Thanks for stopping by and letting me know what you think!

Thanks,
Karen

Friday, March 13, 2015

Stand Up Flower Pot Pocket Card


 I made a flower pot card years ago and I have been thinking about making another one with Spring so near.  I played with the flower dies and my flower punches.  I knew I wanted to use the New Berry Basket Bigz Die.  After playing with the Flower Frenzy Bigz Die and the Bouquet Bigz Die, which I really loved, the flowers were just too big for the card.  I did use the Stem Leaves from the Flower Frenzy and the Leaves from the Bouquet Die.  I used the Pansy, Boho Blossoms, Petite Petals, 3-flowers (Retired), 5-Petal (retired) and Bitty Punch Pack (Retired) Punches for the flowers.  I will say if you get the Bouquet Bigz die, you must get the Build a Bouquet Stamp Set there are a lot of stamps in this set.  I was on the fence with this set, but it is great set for flowers and backgrounds.  I used this stamp set for the lines on Berry Basket, the dots on the flowers, and the center for the White and Crisp Cantaloupe Flower.   I meant to stamp the leaves but I forgot.  The Butterfly was used with the New SAB Nature's Perfection Stamp Set.  The little (Bread) Clip is from the Handpicked Framelits.  I love that little clip.  The "Best Buds" is from the Matching Stamp Set From the Garden.  The "One of a Kind" is from a retired Postage Due Stamp Set.


I did use the Kraft Paper for the cardbase because I wanted it to be sturdy.

The great thing about this card is it will fit inside a regular envelope.  I would recommend hand delivering this card or pay for extra postage.

Thanks for stopping by and letting me know what you think!

Thanks,
Karen


Tuesday, March 10, 2015

Pop Out Swing Card - Birthday Card - Sheltering Tree


I was inspired last week when I came across this beautiful card made by Cindy Brumbaugh.  I loved the pop out swing idea and knew I wanted to make one.  Today when I was working on the Sheltering Tree Stamp Set I came across this super cute card made by Julie Davison.  I knew I was going to make the Pop-Out Swing Card with the Sheltering Tree.  I added an additional layer of Crumb Cake that was stamped with the Hardwood Stamp set to the card front.  I also added a layer of Lost Lagoon to the inside of the card.  I had this card in mind for a boy but I think it is a great Masculine Card. The colors can be changed around a little.  I just love the bike and love the idea that it is stamped twice, it looks so real.  I only wished this stamp came with a little bench, I think that would be prefect under the tree.  I went with the Wild Wasabi, Lost Lagoon, Early Espresso, Crumb Cake, and Whisper White. I added some of the Lost Lagoon twine from the New SAB In Color Accessory Kit.  Those little spools of twine are so cute.


Thanks for stopping by and letting me know what you think!
Thanks,
Karen

New Photopolymer Stamp Set and Weekly Deals

NEW - Just Kidding Photopolymer Stamp Set (#140667) is available to order.     


Items are available while supplies last.


Blendabilities Update


I have some Sad news to share with you - The Blendabilities Product Line has been Discontinued.  I know.. I was really starting to love them and grab them to use on my cards and projects.  

The Blendabilities markers have been experiencing defect issues over the past few months, mainly many of the markers arrived dry to the customers.  In a nutshell, the manufacturer is unable to correct the problem and provide Stampin' Up! with a solution.  The good news is that Stampin' Up! is committed to ONLY selling the BEST products available, so rather than ship a defective product and continue to send replacements, they have made the decision to pull the product line.

The Memento Black Ink pad and refill will still be available.

What should you do?


  • If you currently have a pack of Blendabilities on backorder that you purchased, do nothing, you will receive a refund from Stampin' Up! within the next month.
  • If you placed the order through me and you ordered the Blendabilities and have a defective one or want to exchange for another Sale a Bration choice, please call or email me and I will take care of calling Stamping Up and filling out the survey for you.    
  • If you have selected a free pack of Blendabilities from hostess rewards or from a Sale a Bration choice  and they are on backorder or defective, please complete the survey (CLICK HERE) - have your original order number handy - and you will be able to select a replacement Sale a Bration or hostess item. 
  • If you feel you have a defective package of Blendabilities, please contact Stampin' Up! Demo Support at 1-800-STAMPUP.
I hope all is well with everyone and I am going to get back to stamping.

Thanks,
Karen


Friday, March 6, 2015

Four New Sale-A-Bration Items


Four new SAB goodies have been added!  

Check out the flyer here.  


PP234 Indescribable Gift Interlocking Gate Fold


Here's a card I created using The Paper Players - Theme Challenge - "Think Spring".  With old man winter not ready to go away, and has decided to give us another 6" of snow in Maryland.  I really am looking forward to some warm weather.  What better time to play with one of my favorite stamps from the Spring Catty.  I have been playing with this stamp set, and I love this image on Vellum and using my Blendabilities to color it from behind the image.  I love the soft look.  This is the second card I created using the same layout, the card below is I first one I created but I was not like it with the Early Espresso.  I wanted the flowers to be a focal point of this card and I think I achieved this with the second card (above and to the right).  When I switch to Crumb Cake, Very Vanilla, Blushing Bride and Pear Pizzazz.  

 I have seen so many great cards using this stamp and I wanted to make it a little different so that is why I went with the Interlocking Gate Fold Card. The Window Framelits made this easy to make, I have noticed that the Window Framelits are not even on all sizes.  Not sure if it is just me, but I have found that you need to make sure they line up well before adhering them down and sometimes I have to turn them make it work.

Thanks for stopping by!  Please let me know what you think, I love comments!

Thanks again,
Karen