Tuesday, December 22, 2015

2015 Craft Fair Pictures

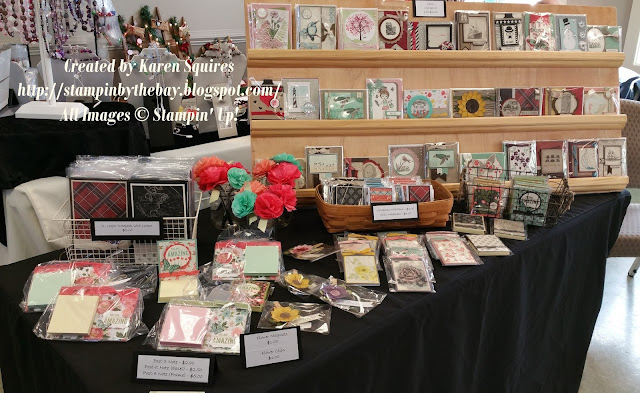
As promised here are some pictures from my craft fair this year.  If you would like more information or videos on the items, please let me know.


I was happy to use some of the new Designer Series Paper from the Occasion Catalog 2016, Birthday Bouquet DSP & Going Places DSP on the Post-it Note, Frames and Notebooks.  

Jr Legal Pad with Pocket
Frame Post-it Note Holders
Easel Post it Note Holders
Flower Pens
Small Notepads (3" x 5" & ones with Pens)
Flower Clips
Cards


Wood Slices Gift Tag/Christmas Tree Ornaments

Wood Magnets
Wooden Key chains
Gift Card / Small Gift Holder


Thanks for stopping by and letting me know what you think!
Karen


Friday, December 11, 2015

Craft Fair Saturday December 12th

Hello to my local customers and blog readers.   I have been busy getting items ready for a Craft Fair that I will be attending, this Saturday, December 12th at Jesus the Divine Word, 55 Cox Road, Huntington, Md 20639 (9:00am - 2:00pm).  If you are near by or want to stop by, I would love to see you.

What items will I have?  Some Great Teacher and Co-Workers Gifts.  Hand Stamped Wooden Gift Tags/Ornaments, Wooden Magnets (Christmas and Inspirational), Inspirational Wooden Key-chains, Altered Notebooks (difference sizes), Post it Note Holders, Gift Card Holders and of course Cards!

If you have any questions, please let me know.  

Thanks for stopping by,
Karen

Tuesday, November 24, 2015

Weekly Deals


Here are the Weekly Deals till Monday November 30th.


Sunday, November 22, 2015

Online Extravaganza


Details:

  • Dates: November 23-30, 2015
  • Two 24-hour flash sales for specific products will happen during this promotion: one on November 23 and one on November 30.
  • Past Paper Pumpkin kits and kit refills in Online Extravaganza are available for purchase by subscribers and non-subscribers.

Shop at my Online Store.

Thursday, November 19, 2015

Craft Fair Saturday November 21


Hello to my local customers and blog readers.   I have been busy getting items ready for a Craft Fair that I will be attending, this Saturday, November 21st at the South River High School located in Edgewater, MD.  If you are near by or want to stop by, I would love to see you.  

What items will I have?  Hand Stamped Wooden Gift Tags/Ornaments, Wooden Magnets, Altered Notebooks (difference sizes), and of course Cards! (and a few other items) 

I will be doing another craft fair on December 12th at Jesus the Divine Word, 855 Cox Road, Huntington, Md 20639 (9:00am - 2:00pm).  

If you have any questions, please let me know.  If I remember to take some good pictures, I will post them to my blog next week.  

Thanks for stopping by,
Karen


Sunday, November 15, 2015

Square Easel Shaker Card


After I made the Shaker Card yesterday, I really wanted one with the snowman from the White Christmas Stamp Set.  I love that stamp set and have not played with it yet this year.  I was torn between the Real Red and Crumb Cake or the Lost Lagoon and Soft Sky, so I decided to do both.  I love the Real Red with the Crumb Cake, I just like the look of the trees and snow against the Crumb Cake but I love a blue snow card.  I made the frames first with the picture and built the easel card to go with the frame (It is a big frame).  I really did not want to make a big square card because I did not want to mess with making envelopes as well.  When making this card, you have to be careful with lining everything up so the card will fit inside a regular envelope.  
This is a little different take on an easel card, because the card front is not the full size, so when the Card is closed you see the "Merry Christmas ..." saying.   I used 1/4" strips of Fun Foam to make the shaker instead of using the framelit to cutout the foam.  For me it was easier to line the strips of foam instead of lining up the square cutout.  

After I stamped my inside piece with the trees and the snowman.  I stamped the snow from the White Christmas Stamp Set with Craft Whisper White Ink.  Used my 2-way glue pen to parts of the trees and the snowy bottom and applied the Dazzling Diamonds Glitter.  The Dazzling Diamonds did stick to some of the snow, which made me happy.     


Thanks for stopping by and letting me know what you think!
Karen


Saturday, November 14, 2015

Let it Snow Shaker Card


Here's a card I made using the Happy Scenes Stamp Set and instead of using the Window Framelits I layer one of SU circle framelit and scallop circle framelit to create the frame.  I also used the framelits to cut out my fun foam to build the shaker part.  I used a bottle of glitter I had for the snow.  

Thanks for stopping by and let me know what you think!
Karen


Tuesday, November 10, 2015

Snow Place Side Step Card


When I was playing with the Brother Scan N Cut 2, I decided to try and cut out the images from the Snow Place stamp set.  I know this stamp set has matching framelits and I have them but I really did not want the border around every image.  I scan and cut a bunch of images from the set and sat down to play.  I kept thinking I wanted to try a Side Step Card, so this is what I created.  I did add 3 trees from the Peaceful Pines set.  This is my first side set card and I really liked the way it turned out.  

Now my question to you all.  Where do you add the greeting and signature to these types of cards?  Do you add it to the inside or the back?  I have never received one of these cards and I was able to get the measurements doing a google search, so I really have no idea.  If you know, could you please leave me a comment and let me know.  Thanks so much.  


I do not know why I did not make one of these cards before, they are really pretty easy and fun to make.  I have a couple other ideas so you may see a few more of these types.

Note: I did trim the Santa's Hat and scarf down with my paper snips.  I did not like the way they were fitting on the body.

Thanks for stopping by and letting me know what you think!
Karen


Monday, November 9, 2015

Peaceful Wreath and Deco Labels


Here's a couple cards I made using the Peaceful Wreath and Wonderful Wreath Framelits.  I added a folded Deco Label at the top of the card and wrapped some wide ribbon around the top flap.  I first card I made using the Pear Pizzazz, Real Red, Sahara Sand and Whisper White and I used the cotton ribbon (see picture to the right).  I liked it but was not thrilled with it.  I wanted wide ribbon so I made another card using my fave Christmas color combo of Cherry Cobbler, Mossy Meadow, Crumb Cake and Very Vanilla.  I added the Retired Linen Cherry Cobbler Ribbon.  I really liked it with the Wider Ribbon, so I looked through my ribbon sash and added some retired Pear Pizzazz Chevron Ribbon to the first card and I love it!   I still don't have a favorite, I really like them both.  

Thanks for stopping by and letting me know what you think!
Karen


Monday, October 19, 2015

15% off Stamps!


Starting today, October 19th - October 23rd.  Don't miss this savings to pick up some of those stamps off your wish list!

Shop on my Online Store!


Friday, October 16, 2015

Serene Silhouette Window Christmas


After playing with the lighthouse card, I had another piece of Sahara Sand stamped with the white ink.  I decided to make another card using the Window Framelit and the birds from the Serene Silhouette Stamp Set.  I added some of the Linen 1" Cherry Cobbler Ribbon (Clearance Rack) to the card to make it a little festive and dress it up a little bit.  I also wanted to make a card that could easily be used for any occasion with changing the greeting on the front and the inside.  There is room to use any stamp set for your greeting.  I really love the look of this Linen Ribbon against the whitewash hardwood.  

Thanks for stopping by and letting me know what you think!
Karen


Nautical Window Scene cased


The other day I was looking for more ways to use the Window Framelit.  I wanted something a little different.  Well I came across this card made by Amy K and I fell in love with it.  I loved all her details and I thought it was genius to use the lighthouse,  I had to recreate one.  If you have not looked at her web site, you should.  She is a very talented demonstrator.

As I was doing this card, I really wanted the glossy look for the window trim. against the whitewash hardwood.  So I pulled put some Retired Glossy Cardstock and cut out my window (if you don't have any you could use glossy photo paper).  I used a well inked White Craft Ink pad and my hardwood stamp to stamp on a piece of Sahara Sand to create the white wash wall. I cut my piece of white 1-1/4" jute ribbon in half lengthwise to add to the nautical look.  

Thanks for stopping by and letting me know what you think.
Karen


Wednesday, October 14, 2015

Brick Wall and Sheltering Tree


Here's a couple cards I creating using the Brick Wall Embossing Folder and the Sheltering Tree stamp set.  I loved the Sheltering Tree Stamp Set and I wanted to make a fall card since spring with this stamp set.  I sat down to create one before I was too late.  I used the little grouping of leaves for the tree, that way I could use all the different colors - Mossy Meadow, Hello Honey, Tangelo Twist, and Cajun Craze.  I sponged the sky using the Hello Honey and Tangelo Twist.  The top one was the second one I created but I like it more, I think the tree pops (I lightly sponged the sky).  The one on the side, is a darker sponged sky.  

Inside of Card


Thanks for stopping by and letting me know what you think.
Karen


Woodland Thankful


Here's the quick card that I made using the New Woodland Embossing Folder, This new embossing folder is in demand and there is a backorder but it is one you should add to your list if you don't already have it.  With this card, I used my brayer to ink the embossing folder with Crumb Cake Ink and ran my piece of Crumb cake through the big shot.  Next I used my Crumb Cake marker to highlight the lines on the trees.  Doing this really made the trees pop. I attached this to the Cajun Craze Cardbase.  

I wrapped the 5/8" striped Cotton Ribbon Mossy Meadow around the top of the card.  I cut out some leaves from the Square Pillow Box Thinlit Die with Hello Honey, Mossy Meadow, Tangelo Twist, and Cajun Craze scraps and attached to the trees.  

The saying is from the Hostess Six Saying Stamp set in the Holiday Catalog and is stamped with Mossy Meadow Ink.  I used a cut piece of Burlap Ribbon to attach behind stamped very vanilla piece. 

What I like most about this card, it could easily be used for any occasion.  All you have to do is change the saying on the front for Birthday, Thinking of You, etc.

Thanks for stopping by and letting me know what you think.
Karen


Z-Fold Sea Turtle


I have a workshop this weekend and this is one of the cards we will be making.  Some of the ladies loved this Land to Sea Card I made in June but never made it.  So I thought I would recreate a similar card using the turtles, which I love from this set.  

  • The background was created a little differently.  I lightly sponged the whole piece of Watercolor paper with the Soft Sky Ink.  Using a torn piece of paper, I sponged Pool Party and Mint Macaroon to create the ripples of water.  Lightly sponged the edges using the Mint Macaroon Ink.  After the background was created I used a very wet Aqua Painter and hit it against my fingers to leave water drops on the card.  That is how I created the droplets on the card front.  
  • Once the card was dry, I used the torn piece of paper, I sponged the bottom with crumb cake ink to create the sand.  
  • I used the bottom of the Jelly Fish to create the sea grass, using the Pool Party and Mint Macaroon Ink.  
  • I stamped 3 turtles in Early Espresso Ink on a scrap of very vanilla.  I used my Crumb Cake and Mint Macaroon marker to color the turtles. I fussy cut all 3 turtles and attached 2 to the card front and 1 to the inside piece.  

Thanks for stopping by and letting me know what you think!
Karen

Built for Free Using: My Stampin Blog

Saturday, September 19, 2015

Iridescent Silent Night


This is a Wow Card!  It looks amazing in person.  This card is made using the Wonderland Stamp Set.   I started with a piece of Whisper White Cardstock and I sponged a sky using Lost Lagoon, Pool Party and Mint Macaroon ink.  I did use a mask for the moon.  After sponging the sky, I stamped the trees with Mossy Meadow and repeated stamping two and three more time before reinking.  Once the piece has been stamped, I covered the front with Versa Mark Ink, Iridescent Ice Embossing Powder and heat set.   The front piece was matted on a piece of Mint Macaroon and Sahara Sand and aligned on the bottom left side of the card front.    


Thanks for stopping by and letting me know what you think!
Karen


Built for Free Using: My Stampin Blog

Holly Jolly Christmas


Here's a card I made using lots of goodies from the Holiday Catalog.  This card does take some time to create but it was a lot of fun and really makes a stunning card.  I have been really in love with the Mossy Meadow, Cherry Cobbler and Crumb Cake color scheme for Christmas.  I have been inspired by lots of Christmas cards on Pinterest.  
Thanks for stopping by and letting me know what you think!  
Karen


Built for Free Using: My Stampin Blog

Thursday, September 17, 2015

All is Calm Winter Wonderland


I was playing around with the Wonderland Stamp Set today and this is the first card I created. I love the look of snow on evergreen trees whenever it snows.  I used the Merry Moments Designer Series Paper from the Annual Catalog, the wooden Snowflake Elements, and a little Gold Cording from the Holiday Catalog.  The snow was used with a White Gel Pen.  I used the saying from the Six Sayings Hostess Stamp Set for the inside of the card.  
Thanks for stopping by and letting me know what you think!
Karen


Built for Free Using: My Stampin Blog

Wednesday, September 16, 2015

FMS204 Reason for the Season


For the past couple weeks, I feel like I have lost my mojo.  I have been trying to make Christmas Cards, with all the new goodies from the Holiday Catalog but it is epic fail.  I am not sure why I am having such a hard time but I think I just have too many ideas in my head and I am still thinking of Halloween/Fall.  So today I sat down with the new FMS204 sketch from Freshly Made Sketches, and finally have a Christmas Card to show you.  I really like how this card turned out.  I used the Festive Flower Punch, Reason of the Season Stamp Set and the Home for Christmas DSP.  After making the first card, I decided to make another one with a Cherry Cobbler Flower.  My favorite is the White Poinsettia Card.  

Here's the inside of the card.  I absolutely love this stamp set, love the verses and the images.  The petals were sprayed with the Homemade shimmer mist to really make the flowers shine which is hard to see in the pictures.  

Thanks for stopping by and letting me know what you think!
Karen


Built for Free Using: My Stampin Blog

Sunday, August 23, 2015

Z-Fold Vintage Leaves Masculine Card


Here's a Fall Masculine Card using the Vintage Leaves Stamp Set and the corrugated paper.  I have been wanting to use this corrugated paper since my first order from the new catalog.  It was something that I almost missed when I looked at the new catalog.  In case you missed the paper, it should be on your next order!  I went with the Cajun Craze and Delightful Dijon to stamp the leaves on the very vanilla piece.  I used my favorite Gorgeous Grunge Stamp and the Early Espresso Ink to create the splatter.  I sponged the edges with the Early Espresso Ink.   

Thanks for stopping by and letting me know what you think!
Karen


Built for Free Using: My Stampin Blog